MirrorlessLensWorld.com • Updated February 2026
Buying the right lens matters more than upgrading your camera body. If you’re new to Sony mirrorless, the lens you choose will shape everything: sharpness, low-light performance, background blur, autofocus, and even how enjoyable your camera feels to use. This pillar guide gives you a simple “Lens Finder” table, beginner-friendly explanations (APS-C vs full-frame, prime vs zoom), and conversion-optimized product cards with Amazon affiliate links to help you buy with confidence.
Quick Takeaways (Beginner Lens Picks)
- Best first prime upgrade (APS-C): Sony E 35mm f/1.8 OSS (sharp, stabilized, great indoors)
- Best one-lens travel zoom (APS-C): Sony E 18–135mm OSS (wide to tele flexibility)
- Best budget portrait prime (Full-Frame): Sony FE 50mm f/1.8 (easy background blur)
- Best wide for landscape/vlogging/astro (Full-Frame): Sony FE 20mm f/1.8 G (wide + bright + sharp)
- Best wildlife/sports tele (APS-C): Sony E 70–350mm G OSS (big reach, manageable size)
Affiliate disclosure: As an Amazon Associate, MirrorlessLensWorld may earn from qualifying purchases (at no extra cost to you).
Top Picks (Highest Value for Beginners)
These are the “safe” choices most beginners won’t regret. Each card includes a simple use-case summary, beginner notes, and a clear call-to-action.
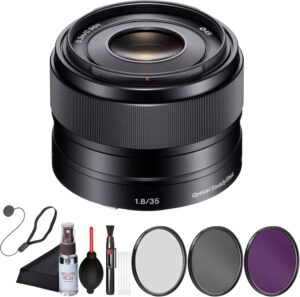
Sony E 35mm f/1.8 OSS (APS-C)
Best first prime upgrade for APS-C beginners. Natural perspective, great indoors, and stabilization helps handheld sharpness.
- Best for: everyday, portraits, low light
- Why beginners love it: f/1.8 + OSS = clean indoor shots
- Watch out: designed for APS-C (E-mount crop)
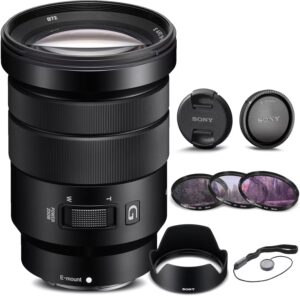
Sony E 18–135mm OSS (APS-C)
Best one-lens travel zoom for APS-C. Covers landscapes, street, portraits, and details without constant lens swaps.
- Best for: travel, family, everyday flexibility
- Why beginners love it: one lens handles most situations
- Watch out: slower aperture indoors; pair with a fast prime if needed
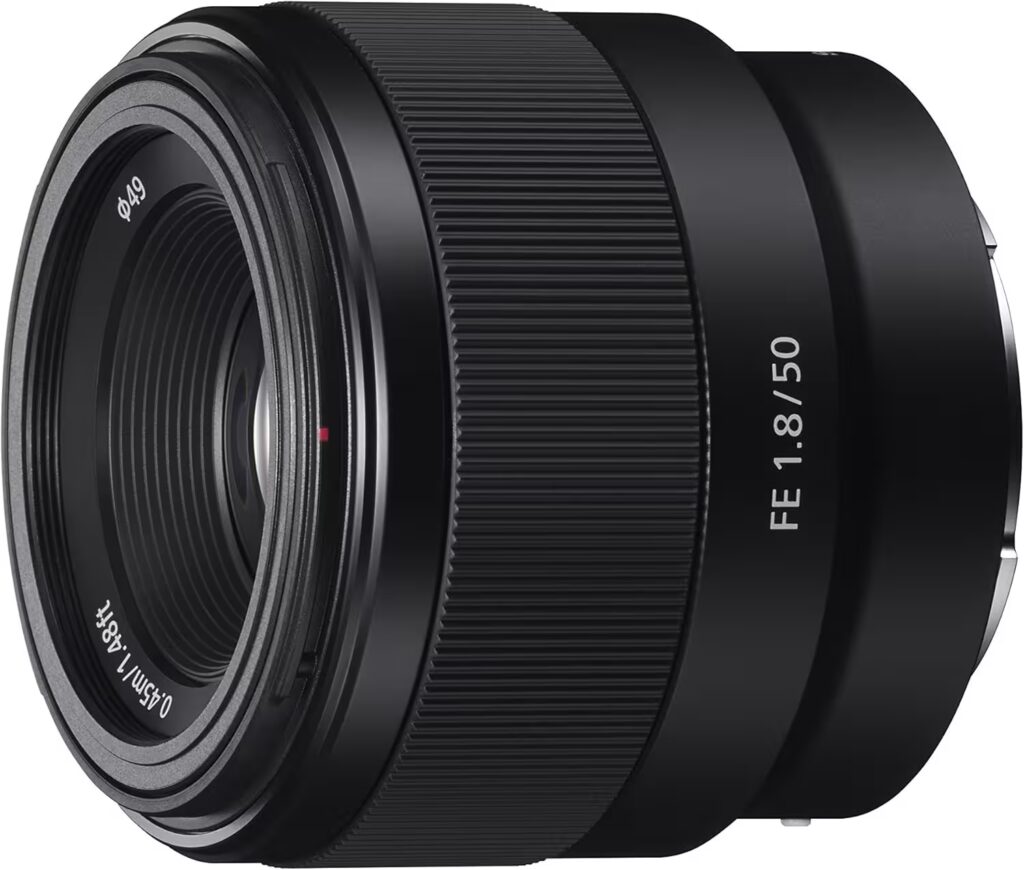
Sony FE 50mm f/1.8 (Full-Frame)
Best budget portrait prime for full-frame beginners. A cheap way to get that “pro look” with smooth background blur.
- Best for: portraits, lifestyle, detail shots
- Why beginners love it: affordable entry into primes
- Watch out: AF isn’t as fast as newer premium lenses
Lens Finder: Pick the Right Sony Lens in 30 Seconds
| If you shoot… | Best beginner lens | Why it’s the best match | APS-C | Full-frame |
|---|---|---|---|---|
| Everyday + indoor photos | Sony E 35mm f/1.8 OSS | Fast aperture + stabilization = cleaner handheld indoor shots | ✅ | — |
| Portraits on a budget | Sony FE 50mm f/1.8 | Easy background blur + flattering perspective | ✅ (crop) | ✅ |
| Travel and “one lens only” | Sony E 18–135mm OSS | Wide-to-tele flexibility without swapping lenses | ✅ | — |
| Vlogging + landscapes + astro | Sony FE 20mm f/1.8 G | Wide + sharp + bright for low light + clean edges | ✅ (crop) | ✅ |
| Wildlife + sports | Sony E 70–350mm G OSS | Huge reach in a manageable package for beginners | ✅ | — |
Before You Buy: Sony E vs FE, APS-C vs Full Frame (Beginner Explanation)
Sony mirrorless cameras use the E-mount, but lenses are designed for either APS-C (crop) or full-frame sensors. Sony labels help:
- E lenses are designed for APS-C cameras (A6000-series, ZV-E10).
- FE lenses are designed for full-frame cameras (A7/A9/A1) and also work on APS-C.
Beginner rule: FE lenses work on everything. E lenses are optimized for APS-C and will crop on full-frame. If you plan to upgrade to full-frame soon, FE can be a long-term investment. If you’re staying APS-C, E lenses are often smaller and cheaper—perfect for beginners.
Prime vs Zoom: What Beginners Should Choose
Choose a Prime Lens If…
- You want blurry backgrounds (subject separation)
- You shoot indoors / low light and need a wide aperture
- You want to learn composition faster (“zoom with your feet”)
- You want a lightweight daily carry lens
Choose a Zoom Lens If…
- You want flexibility (travel, family, events)
- You don’t want to swap lenses often
- You shoot outdoors in decent light
- You want one lens that “does it all” while learning
Best beginner strategy: Keep it simple. Start with one versatile lens (kit lens or travel zoom), then add one fast prime for low light and portraits. That combo covers most real-world situations.
At-a-Glance Specs Comparison (Beginner-Friendly)
| Lens | Type | Aperture | Stabilization | Beginner Strength | Best For |
|---|---|---|---|---|---|
| Sony E 35mm f/1.8 OSS | Prime (APS-C) | f/1.8 | OSS | Clean indoor shots + subject separation | Everyday, portraits, street |
| Sony E 18–135mm OSS | Zoom (APS-C) | f/3.5–5.6 | OSS | One lens to learn focal lengths | Travel, family, general use |
| Sony FE 50mm f/1.8 | Prime (FF) | f/1.8 | No | Budget portraits | Portraits, lifestyle |
| Sony FE 20mm f/1.8 G | Prime (FF) | f/1.8 | No | Wide + low light + sharp | Landscape, vlog, astro |
| Sony E 70–350mm G OSS | Zoom (APS-C) | f/4.5–6.3 | OSS | Long reach without huge weight | Wildlife, sports |
Best Sony Lenses for Beginners (By Shooting Style)
Below, each category starts with a small comparison table (for fast scanning), followed by product cards with clear beginner guidance.
Everyday + Low Light (Indoor Photos, Family, Street)
| Best Pick | Why | APS-C | Full-frame |
|---|---|---|---|
| Sony E 35mm f/1.8 OSS | Fast aperture + stabilization for sharp indoor shots | ✅ | — |
If your photos look noisy indoors or your subjects don’t “pop,” a fast prime is the most dramatic upgrade you can make. The Sony E 35mm f/1.8 OSS gives you natural perspective, bright f/1.8 performance, and stabilization that helps handheld sharpness—especially useful if your camera body doesn’t have IBIS.
Sony E 35mm f/1.8 OSS
Beginner tip: Use f/1.8–f/2.8 indoors, focus on the nearest eye, and keep shutter speed at 1/125s or faster for people.
When to Upgrade to This Lens
- Your indoor photos are always above ISO 3200
- Backgrounds look distracting even when you “zoom in”
- You want a simple daily lens that’s easy to carry
Travel + “One Lens Only” Simplicity
| Best Pick | Why | APS-C | Full-frame |
|---|---|---|---|
| Sony E 18–135mm OSS | Wide-to-tele range covers most travel scenes | ✅ | — |
The fastest way to miss moments while traveling is constant lens swapping. The 18–135mm is a beginner favorite because it keeps your kit simple while still giving you creative flexibility. Use 18mm for landscapes and interiors, 35–70mm for general street shots, and 85–135mm for portraits and details.
Sony E 18–135mm OSS
Beginner tip: Outdoors, use f/5.6–f/8 for crisp landscapes. For portraits, zoom toward 70–135mm and step back slightly for flattering perspective.
Ideal 2-Lens Travel Kit
- Daytime travel: 18–135mm
- Night / indoor: add the 35mm f/1.8 OSS
Portraits (Beginner-Friendly Background Blur)
| Best Pick | Why | APS-C | Full-frame |
|---|---|---|---|
| Sony FE 50mm f/1.8 | Affordable, flattering perspective, easy blur | ✅ (crop) | ✅ |
Portraits are where beginners often want that “real camera look”—sharp subject with a smooth, blurred background. A fast prime makes this easy. On full-frame, 50mm feels natural and flattering. On APS-C, it becomes more like 75mm equivalent—excellent for tighter portraits.
Sony FE 50mm f/1.8
Beginner tip: For the best blur, place your subject several feet from the background and shoot at f/1.8–f/2.8.
Quick Portrait Settings (Start Here)
- Mode: Aperture Priority (A)
- Aperture: f/1.8–f/2.8
- Shutter: keep 1/125s+ (or faster for kids)
- AF: Eye AF / Face detection ON
Wide-Angle (Landscapes, Vlogging, Astrophotography)
| Best Pick | Why | APS-C | Full-frame |
|---|---|---|---|
| Sony FE 20mm f/1.8 G | Wide + bright + sharp = huge creative range | ✅ (crop) | ✅ |
Wide lenses give beginners instant “wow” potential: dramatic landscapes, spacious interiors, and dynamic video. The FE 20mm f/1.8 G stands out because it’s both wide and bright, making it strong in low light (night streets, indoor scenes, and astrophotography).
Sony FE 20mm f/1.8 G
Beginner tip: For landscapes, try f/5.6–f/8. For astro, start at f/1.8 with a tripod and experiment with 10–15s exposures.
Wide Lens Beginner Mistake
Don’t shoot faces too close at 20mm (it can distort). For people shots, step back slightly and keep faces near the center of the frame.
Wildlife + Sports (Beginner Telephoto Reach)
| Best Pick | Why | APS-C | Full-frame |
|---|---|---|---|
| Sony E 70–350mm G OSS | Big reach, sharp results, not overly heavy | ✅ | — |
If your subject is always tiny in the frame, you need reach—not a new camera body. The 70–350mm G OSS is an excellent first serious telephoto for APS-C users. It’s sharp for a long zoom, portable enough for travel, and gives you enough reach to make wildlife and sports genuinely possible.
Sony E 70–350mm G OSS
Beginner tip: Start with 1/1000s for birds in flight, 1/500s for moving wildlife, and increase ISO as needed.
When to Buy a Telephoto
- You always crop heavily to see your subject
- You shoot birds, pets, or outdoor sports often
- You want sharper action shots with better subject isolation
Common Beginner Mistakes (and How to Avoid Them)
- Buying too many lenses too fast: Start with 1–2 lenses, learn your shooting style, then specialize.
- Ignoring aperture: For indoor photos, a fast prime matters more than tiny sharpness differences.
- Not checking APS-C vs full-frame compatibility: E vs FE affects your results and future upgrades.
- Chasing “pro” gear too soon: lighting and technique improve photos faster than expensive upgrades.
- Forgetting size/weight: the best lens is the one you actually carry.
A Smart Beginner Upgrade Roadmap
- Start with a daily lens: kit lens or 18–135mm travel zoom.
- Add a fast prime: 35mm f/1.8 OSS (APS-C) or 50mm f/1.8 (full-frame).
- Specialize: 20mm for wide work or 70–350mm for wildlife/sports.